
Overview
This guide walks through setting up a loyalty program in which participants earn points for the actions you choose, accumulate them in a Reward Bank, and redeem them for rewards you configure. Before you start, settle three decisions with your team:- Which actions earn, and how many points each is worth.
- What points buy, and at what rate.
- Where members see their balance — embedded in a page you own, or on a standalone page.
Step 1: Create the Program
A loyalty program is built as a Reward for Action program, with one way to earn for each action you reward.- On the Programs page, click + New Program.
- Choose the Reward for Action program. If it is not available, contact your CSM.
- Add it as a new program and give it a name.
Reward for Action and Offer are two names for the same program type and template. You may
see either in My Extole and across this documentation.
Step 2: Install the Reward Bank Extension
- Navigate to Partners > Extensions.
- Locate the Reward Bank Extension and install it.
Step 3: Create Your Redemption Options
Redemption Options are what a balance converts into, such as a gift card or an account credit.- Navigate to Rewards.
- Create a reward supplier for each redemption option you want to offer, configured with a dynamic value of 100 percent so the member’s balance determines the amount.
- Set the maximum to match the limit your reward provider enforces.
Step 4: Add Collectible Rewards
Collectible Rewards are the points members earn. Create one per way to earn.- Open the Reward Bank extension and click + New Collectible Reward.
- Give it a name that includes the value, so it is identifiable in a list. For example,
Collectible Reward 15 Points. - Set the value and choose the denomination.
- Toggle Enable on.
- For a percentage-based reward, such as points per dollar spent, enable the dynamic toggle, set the percentage, and set the minimum and maximum a member can earn per transaction.
Step 5: Configure Redemption
Still in the extension:- Under Redemption Options, select the dynamic rewards you created in Step 3. Choose the dynamic reward, not a specific amount.
- Under Redemption Minimum Value and Redemption Maximum Value, set the smallest and largest
monetary amount a member can redeem at one time. Setting either to
0disables it. - Under Redemption Ratio, set how many points make one dollar. The default is
1, so one point is worth one dollar. Set it to10and ten points are worth one dollar. - Scroll to the top and save.
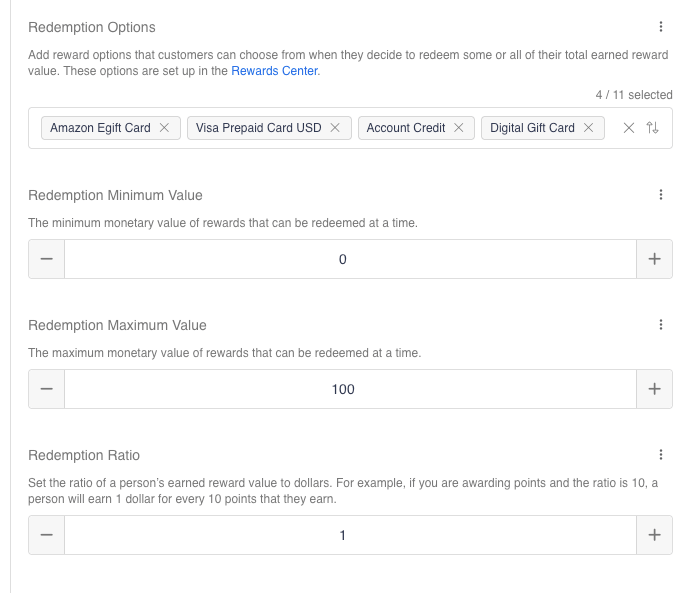
The redemption settings in the Reward Bank extension.
Step 6: Attach Your Ways to Earn
Each way to earn is an event in your campaign with a Collectible Reward attached.- Open your program’s Flow tab.
- Select the event that represents the action, or add a new business event for it. See How to Add a New Business Event.
- Confirm the Event Name matches the event being sent into Extole. If the incoming event name differs, set the incoming name under Triggered on Input Event > Trigger Event Names.
- Add the Collectible Reward for that action.
- Set the Reward Behavior:
- Review the Reward Rules. Keep the quality and limit rules that apply, and remove those that do not. See How to Set Up Reward Rules.
Step 7: Set Up Member Access and Emails
Members reach their balance through the Redemption Center, which embeds into a page you own, or the Redemption Center Microsite, a standalone page. It redirects to the Redemption Center zone, so you only need to customize one. Members must reach the Reward Bank as a verified consumer. Access from an email link is authenticated with a JSON Web Token appended to the link. Customize the redemption email, and point your earned reward emails at the Redemption Center so members have a route back to their balance.Configuring earned reward emails to direct members to the Reward Bank may need help from Support,
as may the email links when you run multiple Reward Banks. Contact Extole Support to set these
up.
Step 8: Test and Publish
Before publishing, confirm each way to earn end to end:- Send a real event for the action.
- Find the participant in User Support and confirm the reward appears on their profile.
- Open the Redemption Center as that participant and confirm the balance and the redemption options are right.
- Complete a redemption and confirm the reward is fulfilled and the redemption email arrives.